Building envelope consultants are often called upon to address and diagnose water infiltration issues or leaks at fenestration assemblies (windows, doors, skylights, curtain walls, storefronts, etc.,) or at other building assemblies. The American Society for Testing and Materials (ASTM) and the American Architectural Manufacturing Association (AAMA) are two of the many organizations with industry-developed standardized tests for fenestration, though there are other tests that can be conducted at non-fenestration assemblies. The following article explores the methodology and logic in determining the sources of leaks through other construction assemblies by way of conducting a water test.
THE BASICS OF LEAK INVESTIGATIONS
Performing water testing on non-fenestration building assemblies requires an understanding of all types of construction, as well as significant knowledge of building science and the nature of the materials. Water comes in many forms and it can sometimes move in mysterious ways. Plumbing leaks are a typical cause of water issues, though they can also come from groundwater, rainwater or condensation, or water vapor.
It is helpful to determine the origin of the leak, specifically if it is a plumbing leak or a weather-related leak. Do the building assemblies leak only after a weather event or is it a constant leaker, in which case it is likely a plumbing leak? Sometimes, as in the instance of a storm drain, it can be both.
If it is a plumbing leak, the issue can be a supply line, waste line, storm drain, steam or hot water heating, or condensate line. If the leak is coming from ductwork, it should be determined if the water is condensation or stormwater.
If water is coming through the foundation wall it could be groundwater, a broken pipe, or an underground stream. Sometimes specific water tests can help identify the source. The presence of chlorine will generally indicate a municipal water main break, E. coli will indicate a sewer main break, and the absence of either substance can indicate groundwater or an underground stream. Some bacteria, but no E. coli, generally indicates surface stormwater.
Other details to identify are locating where the water has entered the interior and understanding the general construction of the building. If water is appearing on the ceiling, what is the construction of the ceiling? Is the ceiling a suspended gypsum board or is it a suspended ceiling tile system? The answers to these questions on what these materials are, what the density of these materials are, how thick they are, and how they are assembled are imperative to the beginning of a leak investigation. Other questions to ask are:
- Are there nearby plumbing lines, storm drain lines, domestic water lines, steam lines, and mechanical ductwork?
- Are there any layers of membranes or impermeable coatings?
- Are there chemical water repellents?
The next step is to investigate the ceiling cavity, if included, and look at the floor or roof above. Sometimes, destructive probes may be necessary to carefully look at each layer of material, almost in a way that an archeologist carefully removes layer after layer of material. A coating can sometimes be nothing more than a thin discolored layer that can easily be overlooked.
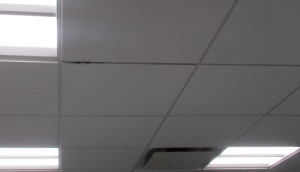
Leak from suspended ceiling. Measure location relative to exterior walls and windows in two directions so the leak can be located from the roof.
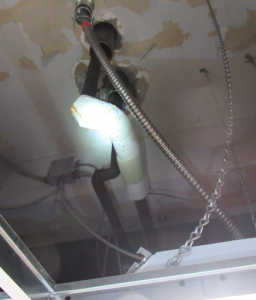
The suspended ceiling space directly above the underside of the roof slab.
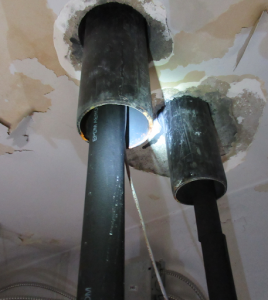
Look for discolored or wet spots, water, or rust stains from the pipe sleeve.
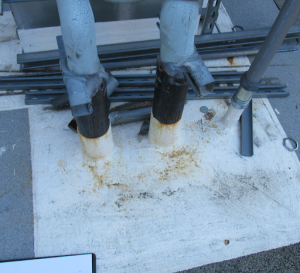
Pair of pipe sleeves located on the roof and measured from exterior walls or parapets corresponding to the pipe sleeves observed below.
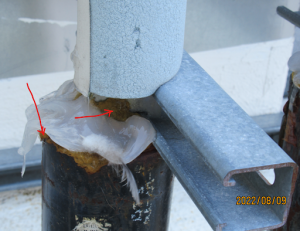
Close examination of pipe sleeves reveals the sloppy or partial application of silicone sealant where absorptive and still-wet fiberglass insulation is partially exposed to the elements. In this instance, the source of the leak was clear, and no water test was needed.
SURFACE TENSION
A 360° view around the entire leak area is a vital next step to see if the water is traveling horizontally. Though a leak might be located inside, it often does not always correspond directly to a leak on the roof immediately above it. For instance, water could drip down a sloped rafter or framing member and travel along that framing member before it drips down to the ceiling where it becomes visible. The surface tension of water can surprisingly change the direction of a leak a far distance.
Surface tension and the lack of a simple drip edge can have lasting effects on a leaking situation. In the photo below, the lack of a proper drip edge from the balcony slab above was one of several factors that caused the water infiltration and collapse of the gypsum-based fascia and soffit.
ROOF DRAIN LEAK INVESTIGATION EXAMPLE:
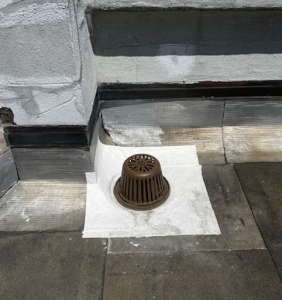
In another example, a roof drain and drain flashing were suspected to be leaking after a heavy downpour. The drain is a JR Smith 1083 Raintrol drain that allows for stormwater flow rate adjustment. These drains were installed throughout the roof to slow the flow of stormwater which was often overwhelming the building’s stormwater system. During a downpour, leaks occurred two floors below the roof. Rimkus tested the drain and drain flashing at the roof first by removing the strainers and plugging the drain with an expanding drain plug. Approximately 4” of water and an area of about 5’- 6’ in diameter was flood tested for about 30 mins. No water was observed in the chase or on the pipe. The drain plug was then removed and within 30 seconds, water was observed streaming down the side of the drainpipe.
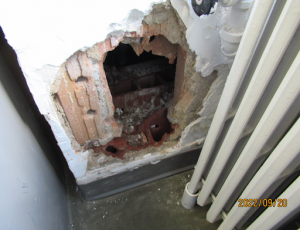
Wall opening
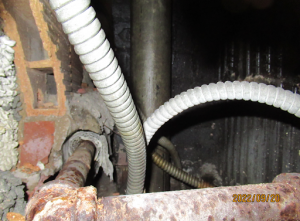
3” cast iron storm drain line
THE PROCESS OF ELIMINATION
By first testing the roof drain and flashing, we were able to conclude that the breach in the system shown above was not in the roof membrane or drain body, but actually somewhere in the drain line between the drain body and the location of the opening in the plumbing chase wall.
Using the process of elimination and isolating the area being wetted are two key steps to take. This way, when it does leak, you can accurately attribute the leak to a specific location or component of construction. It is also vital to allow sufficient time for water to migrate or work its way through the material or construction assembly. If the process is rushed, it is easy to mistakenly attribute the leak location at a later stage of the test, when the leaking may have occurred at an earlier stage in the testing. If spray testing with a garden hose or spray bar, remember, because of gravity and the nature of water flow, you need to “start low” and work your way up higher in elevation along the slope, up the wall, or up all the key construction assemblies to the highest suspected breach point.
SEQUENCING THE TEST BY STARTING LOW
For example, the photo below shows a second-floor terrace where leaks were reported below the terrace floor under the brick walls.
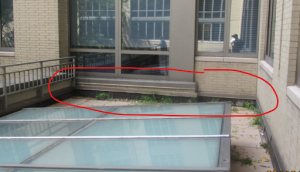
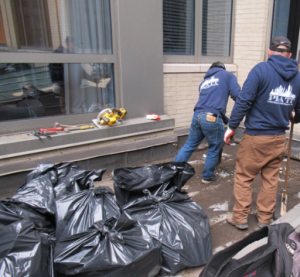
The water testing sequence followed the “start low” rule
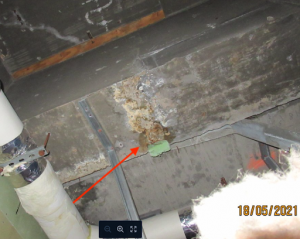
A wet spot was observed after about 25 minutes after stage two of testing
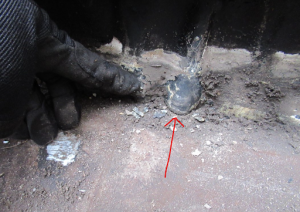
Breach found in EPDM base flashing
The roof slab construction was concrete, so at least one hour was needed to allow for the water to work its way through the concrete. Windowsills were tested for 1⁄2 hour because leaks usually become evident more quickly through sheet metal. In this investigation, we found the breach in the EPDM base flashing. The roof was covered with rigid insulation board and pavers which were removed before water testing.
Sometimes it is a good idea to reconfirm your findings, especially if water is slow to migrate through dense construction materials. You can stop your test, lower the water level to the prior test stage in a flood test, or stop spraying, observe the reduced flow, (sometimes by counting the rate of droplets per minute ), and then retest the area and re-observe the flow rate change. This additional observation will take some extra time, but allows for more certainty in finding the source of the leak.
In the roof drain example above, we did not “start low” since we were only testing two possible assemblies: 1) The roof and drain body and 2) the drain line below the roof. We used the water collected on the roof to test the drain line, which best simulated torrential rain and provided a sufficient volume of water to adequately test the drain line. A garden hose suspended in the drain line may not have provided enough water volume to adequately test the drain line.
In conclusion, no two leak investigations are exactly alike. Some leak investigations are resolved in 20 minutes, and others can take several years to fully resolve. Due to complex constructions, sometimes leaks can have several sources. It can take a long time to cycle through several investigations, tests, and repair cycles before all sources are discovered and repaired. Some final notes on important things to remember when water testing:
- Be aware of where water is flowing and be wary of letting the test go on for too long.
- Do not test overnight unless it is fully monitored or there is no chance of potential water damage.
- All tests need to closely be monitored with a second person with two-way communication from the inside so the water test can be stopped immediately once water infiltration is observed.
- Take note of each test stage’s start times, dwell times, and end times: letting a water test run too long can sometimes result in unintended leaks and costly water damage to adjacent areas.
- Be patient and thorough!
